Tuesday, August 28, 2012

Too many babies! and Diaper Cake

Over the past year, Greg and I have been invited to our fair share of baby showers. Some have been for me, some I have thrown, and some just want my presence. Luckily, I love babies! Especially my own, but that is a given. I am currently planning a baby shower for a co-worker so I wanted to share with all of you my main center piece and instructions of how to make your own. 


Step 1: Ingredients for a diaper cake:

• diapers (depends on how big you make it). A box of near 100 is probably a safe bet. Any extra you can just give to the expectant mother (she’s going to need them)

• Ribbon. Your choice

• rubber bands

• One large baby bottle of baby lotion, baby shampoo, etc or a bottle of champagne

• One small baby bottle of any of the above

• A cardboard or plastic cake platter

• Cake decorations - for example, baby confetti, baby sock roses, artificial roses, etc.

• Baby items - Pacifiers, bottles, lotion, bibs, receiving blankets, miniature stuffed animals, baby towel, onesie, wash cloths, baby hygiene products, toys, etc.

Step 2: Let's build this cake one tier at a time.

For the first tier,

Take the cake platter and place the large bottle of baby lotion in the center. Then place about 4-5 diapers around the bottle and put a large rubber band around the entire ring of diapers.

Begin rolling diapers. Put two of the diapers together and roll them. Fasten shut with another rubber band.

Encircle the bottle with the rolled up diapers, fitting as many as possible into the ring. Repeat the process to form an outer ring. Pat it all into place so that the top is as even as possible

Now take a large, 1/2 to 1 inch wide ribbon and tie it around the entire tier to hold them all together in a circle shape.

Step 3. Repeat the process for the second.

The second tier, instead of 3 rings, will only have 2 rings of diapers. Part of the bottle will be sticking out of the 1st tier, so place 4-5 diapers around it to form the 1st ring of the 2nd tier and encircle with a rubber band. The 2nd, other ring will need the rolled up diapers. Hold them all together in a circle with the 1/2 to 1 inch wide ribbon, just like before.


Step 4: Third tier

Take the small baby product bottle and then take 2-3 diapers and roll them up like before and fasten with another band. And a 2nd ring much like the 2nd tier only with less rolled up diapers. Then place them around the 4 -oz baby bottle and tie your ribbon around it to hold it together tightly in it's shape. Take the top tier and place it on the top.


Step 5: The fun part:

Add little baby items like Pacifiers, bottles, lotion, bibs, receiving blankets, miniature stuffed animals, onesies, wash cloths, baby hygiene products, toys, etc. Place them between the folds of the diaper, tuck the larger items into the outer layer of ribbon.

Add stickers and decorations to match the baby shower theme.

Place a stuffed animal, pair of baby shoes, or something else on top to match the baby shower theme. My co-worker loves butterflies so I added one to this cake.

Done! Cute right? 


Thursday, August 23, 2012

A well placed nick nack is a happy nick nack

 If you have visited my house you will notice I am a little nick nack obsessed. I love them! I thought maybe I would introduce you to a few of my fave decorating pieces.
 
I like turtles. This little turtle double functions as a magnifying glass!
 

 The fireplace is a perfectly balanced mixture of frames and nick nacks. My favorite piece on the mantel is this tiny little soapstone elephant. You can't really see it but there is a baby elephant carved inside as well.   

I agonized over this lamp for awhile. I think it is finally growing on me. 
I am also in love with the little green vase and diffuser cover

I love when Pier 1 has their sales. I got this beautiful red lantern for less then $5!

This turtle candle holder for $1

The nick nacks have also started spilling into the family room downstairs. 
This nice little grouping includes a vase from World Market, an empty wine bottle, and a tiny planter that will eventually hold a cute pink flower.
 

I did finally finished the little dining room display.
 

I printed these 3 pictures and they make a wonderful little addition to the display. 
They also tie into the Seattle architecture/art theme I got going on.

Speaking of Seattle Architecture/Art, we moved the Seattle Skyline picture (taken by yours truly) the wall space above the stairway. Its a perfect fit!
  
AND we updated our photos! Jacob has place on the wall as well as in our hearts. 
It makes the wall look nice and full.

My newest nick nack is my new fave. I bought this piece off eBay.

Sadly, it does not work, (which I knew before I bought it), but it does look lovely on the shelf!

A little inspiration for a little boy's haven

Some may be surprised, but the room I struggle with the most is Aiden's room. As Greg can attest (poor, poor Greg), I have changed this room at least three times. 


I am hoping this is the second to the last time that we have to change it 
(until Jacob is old enough to share the room and we have to get bunk beds).
I will say I think the room gets better every time I change it. 
I can only get better right?


The major issue I have with the room is the fact that it is too long, with too much wall space and too many toys. This time around, when the dust finally settled from all the moved furniture we were left with a huge blank wall. At work the next day I had an epiphany! What if we did a wall of insperation?


Here is what we have so far. 

Saturday, July 21, 2012

Low Decking

For some reason we thought our one deck was not enough. 

To be fair it use to look like this

and now it looks like this

The internet is a great resource. Researching "how to build a low deck" we found a plethora of information. We started with 6 cement blocks with an attached beam joist. Those were dug and strategically placed to hold the base beams. This, Greg would say, was the hardest part. It required lots of adjusting and readjusting to get everything level. Shout out to Vincent Ching for helping us place the beams in place.


We then added hanging joists and 7 support beams into the interior. Then all we had to do is put the top boards on right? Anyone who has done some DIY will tell you that rarely does a well planned out project go smoothly. It does not help that Greg jinxed his own project by saying out loud "this is going a lot quicker then I thought it was going to take." Done. Jinxed. We learned to late that Home Depot did not carry anything 6 inch boards longer then 8 feet. Boo. We had planned for at least 9 feet. After much measuring and deliberating we ended up with cutting the boards in half for the ends and one single board for the middle. It does create a somewhat noticeable double line issue, but we figured it was not enough to bother us so we continued. 


Now Aiden has a wonderfully dry area to roast his marshmallows...


and we have to figure out what to do with all this excess wood.

Monday, April 30, 2012

Spring Flowers... and some bushes too

There are so few clear days in spring that we decided to spend a few of them planting some much needed color into our yard.


We also added some fresh bark. 

 Alternating purple and white


We also added two bushes, with three more to come.

Sorry for the break.


So I must again, apologize for the long pause in posts. With the introduction of our new little guy (and lack of sleep) it was difficult to drum up the motivation to not only blog but even do some DIYing. However, we are getting used to the little one and we are back to home improving and life improving :)


For more on what we have been doing since Jacob feel free to go to "The Good Life" above.

A Linen Organizing

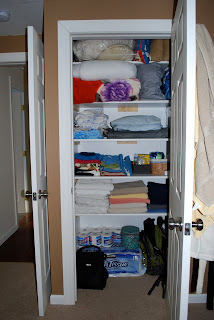
We have a linen closet in our bedroom. Behind closed doors (out of sight out of mind kind of thing) was a really big mess. But every time I opened that door to get a towel or some toilet paper I would cringe. I really wish I would have had the forethought to actually take a picture of the "before," but alas I forgot. No joke, it was really awful we had just begun piling comforters, pillows and sheets on top of each other. 

This the mess it created in our bedroom before we got started on fixing things.

It was pretty simple really once we got started, but you know, getting started is the hard part. Greg cut some bracers, spaced out perfectly apart from each other and then screwed them into the wall. 


We bought some ready primed wood from the "Big Box" store (better known as Home Depot for those of you who have not seen the Ace Hardware store commercials), cut them to size and placed them in. 


See how nice organization can be?